|
|
Guy Fiero - The Radio |
Pick One:
|
|
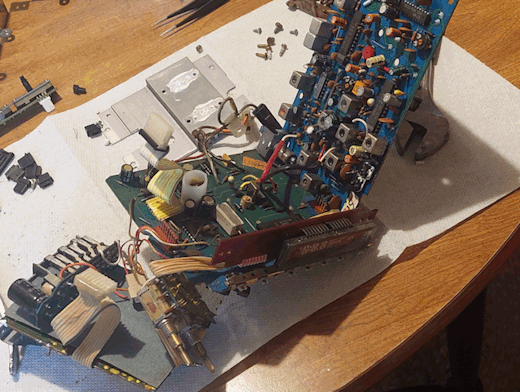
Oh God The Radio. The Fiero came with its original Delco GM radio, featuring AM/FM and a bare-bones tape deck that doesn't even feature auto-reverse. How glamorous. For authenticity (and love of VFDs), I wanted to keep this radio around. Unfortunately, it had a few major problems. First of all, it did not keep time. You could set the clock, come back 10 minutes later, and it would already be behind a couple minutes. Second, the radio did not tune. Or rather, it didn't tune to 99% of the radio spectrum. Somehow, it can only flip between the same two stations. Thirdly, the tape deck does not work. This is the most normal issue, as rubber generally does not enjoy sitting in a hot car for 40 years. Finally, it sounded a bit distorted. Almost like blown out speakers, but different enough to make the radio itself suspect. So obviously I've got my work cut out for me, but I figured with some new belts and a recap it would be just fine. Now I've never exactly done a recap job or fully refurbished a tape deck, but I'm sure it'll be fine. Obviously, the best place to start is by tearing the radio apart. This was a horrible mistake. As it turns out, the psychopaths at Delco decided that this radio and its whopping 5 PCBs needed to be mounted every which way and secured with nothing more than ribbon cables, a thin metal cage, and hope. The hope quickly disappeared, followed shortly by the thin metal cage, leaving just ribbon cables holding this mess of PCBs together.
Oh My Goodness Gracious. So that was a bit trickier than I was hoping, and I'm not entirely sure how I'll be getting it back together, but that is a future problem. Right now, I need to deal with these capacitors. I've never put together a capacitor kit before, but I knew that the voltage needed to be equal or higher, the capacitance needed to be the same, and they needed to physically fit. So armed with this knowledge, I went through the entire radio and noted down each capacitor with its voltage, capacitance, and dimensions. This took quite a while, but afterwards I had a full list of what I'd need to replace every single 40 year old cap in this radio. Followed by an evening browsing Mouser, I had a box full of capacitors on the way. In the meantime, I figured I'd tackle the tape deck. I had even less of an idea what I was doing here, so for the main belt I found a measurement online that seemed about right. For the tires I just measured the inner diameter, outer diameter, and thickness, then ordered the closest matches I could find. Finally, I went through the mechanism and dropped a touch of lithium grease on anything that moved, which seemed to help with tape loading and ejecting. After a few days, my Mouser order came in. I decided to start with the amplifier board, as it's relatively small and usually a problem on these radios. This went off without a hitch, so I moved onto the other boards in the radio. These did not go off without a hitch. I did most of my ordering correctly, but as it turns out I missed one cap on the main board, and one on the radio board. This is highly disappointing, I guess I won't be testing the radio today. While waiting for my second Mouser order to come in, my tape deck parts arrived. The belt and one of the tires fit perfectly, but the rest were too big. Turns out eyeballing it isn't a great strategy. Before I could figure out what to do with the tape deck, my Mouser order came in. I soldered in the two caps and put the radio back together, which was a disaster in its own right. Given the psychotic construction of this radio, I considered only having three screws leftover on my bench a win. I was sure that, assuming the radio didn't explode from a mistake on my part, my efforts would at least fix something. What I wasn't expecting was no change whatsoever. That's right, it still didn't keep time, it still didn't tune to stations, and it still didn't sound great. At this point, I was at a loss. I had no idea what was wrong with this radio, and I had begun to look into replacement options. This is when a glorious opportunity presented itself to me. Dad's 1991 Chevrolet Caprice Classic. Dad had owned this car since he was a young hooligan, and so it had many young hooligan modifications. Being a young hooligan myself, I was very interested in these, not the least of which being the aftermarket Sony CDX-GT400 CD head unit. Now I was very hesitant about harvesting parts from my dad's pride and joy, but as it turns out, my dad had grown into a purist and already wanted to reinstall the original head unit anyways, so he had no problem letting me have the Sony for my rustbucket. This was very exciting, I've been eyeing that Sony radio since I was a kid. I thought it was the coolest thing in the world, so it's very cool to finally have my turn with it. This was one of many modifications that my dad had installed himself, so I was quite excited to inspect his handiwork. Initially, I had trouble getting the radio out of its bracket, but thankfully the original keys to remove it were tucked neatly in the glove box. The radio pulled out, and immediately things went downhill. First of all, turns out there is nothing holding this radio in. The only thing preventing it from pulling out of the dashboard was the trim around it. Horrifying. Even more horrifying was the wiring harness. There are two ways to get audio out of this head unit, you can either use the speaker wires from the harness, or the RCA jacks on the rear of the unit. My dad had opted for the RCA jacks, which is all fine and dandy, but he also decided to completely cut the speaker wires out of the harness. Because I'm not running a dedicated amp in my sound system, I really wanted to use the wires from the harness. Unfortunately with the wires cut completely flush, something would have to be done. In this time of crisis, I turned to a good friend: $13 Pioneer DEH-2400F from a flea market. I had no intention of using this head unit instead, but I had every intention of stealing the pins from its wiring harness to rebuild mine. This went quite smoothly (after learning the hard way how to depin these connectors), it was just a bit time-consuming. After my harness was rebuilt, I had to wire it into the car's harness. For this task I purchased an old GM radio adapter kit, because I wanted my modifications to be reversible should I decide to get another OEM radio later. Kindly, they had labeled each wire with what it did and the colors all matched up with the Sony's harness (since I thought ahead and made sure to keep the colors consistent when rebuilding the harness). After lots of insulation stripping, soldering, and insulating, I was left with a spaghetti mess of wires that definitely could've (and should've) been shorter, but I'm sure I'll find some place to tuck all the excess wire. It'll be much easier to remove than the original radio with this setup, too. I turned the key and the radio came to life. Somehow, I managed to not cross any wires and everything worked first try. Extremely suspicious, but I'll take the win for now. Unfortunately, this did reveal the next bottleneck of the sound system: the speakers. Believe it or not, the original 40 year old Delco speakers are not holding up very well, and I doubt they sounded fantastic when new anyways. The dope-ass headrest speakers are nothing but mids, and you can hear the dash speakers slowly rattling themselves apart. Regardless of the questionable speaker situation, the sound system is more than serviceable for now. I can listen to my Zune and even play some CDs, which is good enough for me. Continue to Daily Driving A Fiero
|
|